I’ve been making some very successful bread lately using the Artisan Bread in Five Minutes technique. I can’t lie, the bread tastes great and is certainly convenient. I’ve taken the original recipe and have been experimenting with adding some whole wheat flour, and the most recent batch I also added some flax seed meal, which is supposed to be super good for me. These additions have added a bunch of flavor to the dough. I’ve also been adding a little bit of dough from each proceeding batch to the new batch, which in theory is enhancing the taste in the same manner as a sour dough. I’m making a batch of dough once every four days or so, making a new loaf every day. The first day loaf tends to have a dense crumb and chewy crust, while the fourth day bread tends to have bigger air holes (while the crumb remains moist) and a crustier crust. These daily loaves are small and are perfect for two people to share for dinner.
But despite the success I have been having, I can’t leave well enough alone. Now that I’ve pretty much mastered the quick and easy method, I felt it was time to tackle one of the more traditional loaves again. In order to be somewhat scientific I decided to go with the basic white bread recipe in Beard on Bread and follow it exactly step by step and see what the results would be.

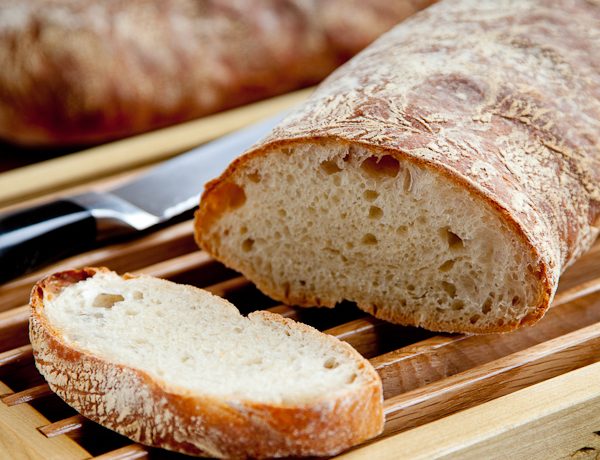
Turns out the results were pretty awesome. This was my first bread pan loaf (as opposed to free form) as it turns out it is the first loaf that I have managed to make using the traditional kneading methodology which hasn’t come out of the oven feeling heavy and dense. The loaf has a nice taste, slightly salty but with a really nice crumb. It is, however, a very white loaf, and even though it clearly isn’t Wonder Bread, it’s still white. I generally prefer something a little heartier like a wheat or rye. I did have a piece toasted with butter for breakfast which was lovely. I could live on toast and butter if the bread is good enough.
Basic White Bread
Adapted from Beard on Bread, by James Beard
Ingredients
1 Package active dry yeast (2¼ Tsbs)
2 Cups of warm water (100°F-115°F)
2 Tsp regular white sugar
4 Cups of all-purpose flour
1 Tb Salt
1.5-2 Tb butter for greasing the bowl and pan
Method
- Mix the yeast, sugar and ½ cup of warm water to proof the yeast. Within a couple of minutes it should be all bubbly and will smell bready and wonderful.
Note: As I mentioned above, in order to give traditional baking a fair shake, I didn’t skip any steps. Therefore, the first step is the proof the yeast. In the past, proofing was a method used to make sure you didn’t have dead yeast. These days you can pretty much skip this step since commercial yeast is nearly infallible as long as it isn’t past the expiration date. But seeing as it effects the amount of liquid and timing I went ahead and did it anyway. - While you are proofing the yeast, mix 3¾ cups of flour with the salt in a large bowl. Mix well.
- Add the water and the yeast mixture to the flour. Mix with a spoon until all of the flour has been incorporated. I ended up using my hands for the last part once it got too stiff to stir with the spoon. Dump the lump of dough out onto a lightly floured surface and knead for several minutes. Beard estimates 4-10. Knead until the dough feels smooth and elastic and most of the stickiness has gone away. Form the dough into a ball and let it rest on the surface for several minutes.
- While the dough is resting, wash your mixing bowl, then coat with butter or vegetable oil. Put the dough in the bowl and coat with the butter or oil, to keep it from sticking. Cover with plastic wrap and sit in a warmish spot for a couple of hours until it has doubled in size.
- Once the dough has doubled in size, fold it down and knead again for several minutes. Form into the shape of a loaf and place it in a buttered pan (I used an antique Bake King pan that is 8½ x 4½x2). Let rise again for another 45 minutes to an hour. Then bake at 400° for 35 minutes.
- At 35 minutes tap the top of the loaf. If it sounds hollow, tip the loaf out of the pan (using oven mitts of course) then tap the bottom. If that sounds hollow as well, you’re done! If not, pop it back in for a bit either on your baking stone or directly on the rack. Watch carefully and make sure that it doesn’t burn.
After Action Report
The time it takes to make one loaf of traditional rise and knead bread doesn’t actually entail much more working time (just a few minutes for the kneading). Most of the time is spent waiting for the bread to rise. In this case, since it’s for sandwich bread and not a dip-in-your-soup type of dinner bread, it can be made in the evening. I started it before I made supper, did the second knead and rise after supper, then baked it shortly before bed. It was nice and cool and slice-able in time for Dr. Fiance to make her lunch for work in the morning.
Best thing I learned through this process: tapping for the hollow sound. I’ve been using this method on my fast-bread too, and it totally works. If it sounds hollow, it’s done!
Moving forward I expect I’m going to keep making the fast-bread from the standpoint of day to day bread needs, but I can’t argue with the quality and taste of the traditional loaf. I think my next project will be to make a pan-loaf version of the fast-bread and do a direct comparison.
Bottom line? It’s going to be very difficult to eat store bought bread again.


3 Comments
J.W.Price
December 2, 2010 at 10:39 pmOkay, this photo of the white bread was making me hungry, but then when you said “toasted with jam for breakfast” I was a complete goner. Am going to have to go cook something right now. Except that it’s 11:30 p.m. Darn it!
I admit I looked at some info on artisan bread in 5, and I wondered if it’s practical for one person. If I only eat one loaf of bread a week, is it worth it? In order to eat more bread that that, I would have to take up running…yuck.
ShootToCook
December 3, 2010 at 7:42 amWell actually the bread lasts quite well in the fridge, up to a couple weeks apparently. We’ve never made it last that long but you can easily make a half batch which comes out to about two loaves. But then again, if you’re only making one loaf a week then the old fashioned way might work just as well too. We are a touch concerned about our carb intake as well, it’s so good we’re worried we’re going to bulk up. I guess it’s ok since it’s winter, no?
Jessie
December 4, 2010 at 8:44 pmI did the artisan bread with a 1:3 ratio of wheat to white flour today and it turned out great.